CISCN线上赛re+crytpto部分WP
简述
较菜,酌情参考
部分题解
ECDSA
操作:
算法:基于ECDSA(椭圆曲线数字签名算法)
task.py: 生成脚本,展示了私钥和签名的生成过程
public.pem: 公钥文件(PEM格式)
signatures.txt: 60个消息及其对应的ECDSA签名
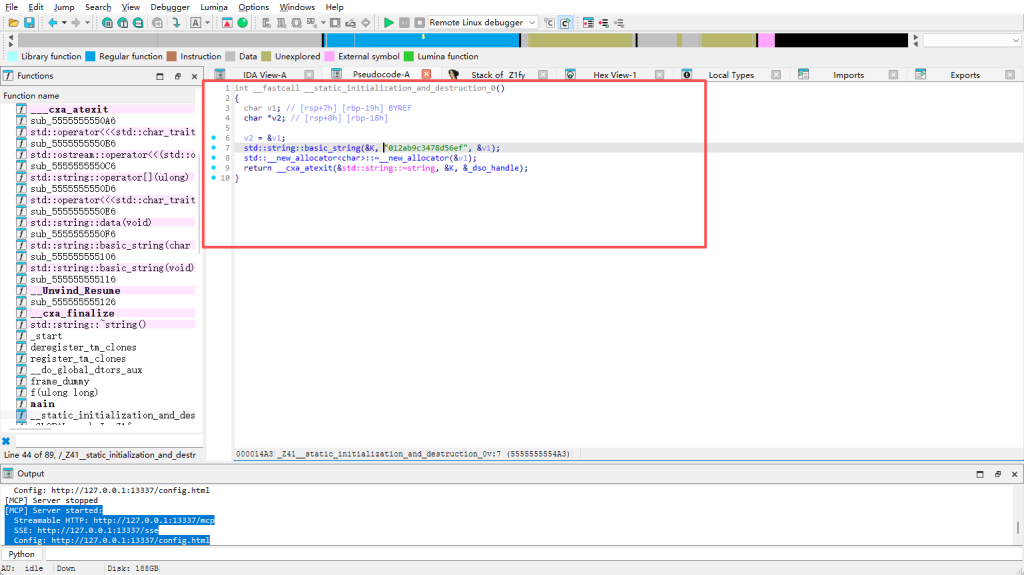
找一下task.py中的核心过程
digest_int = int.from_bytes(sha512(b”Welcome to this challenge!”).digest(), “big”)
curve_order = NIST521p.order
priv_int = digest_int % curve_order
私钥是从固定字符串 “Welcome to this challenge!” 的SHA512哈希值生成的
由此我们可知私钥生成逻辑
写一个python来还原出私钥
脚本
| ###show_private_key.pyfrom ecdsa import SigningKey, VerifyingKey, NIST521pfrom ecdsa.util import sigdecode_stringfrom hashlib import sha512import binascii# 读取公钥with open(“public.pem.txt”, “r”) as f: pub_key_pem = f.read().encode() vk = VerifyingKey.from_pem(pub_key_pem)curve_order = NIST521p.order print(f”\n[信息] 曲线: NIST521p”)print(f”[信息] 曲线阶数: {curve_order}”)print(f”[信息] 曲线阶数位数: {curve_order.bit_length()} 位”) # 步骤1: 计算SHA512哈希print(f”\n[步骤1] 计算固定字符串的SHA512哈希…”)message = b”Welcome to this challenge!”print(f” 消息: {message}”)digest = sha512(message).digest()digest_int = int.from_bytes(digest, “big”)print(f” SHA512摘要 (十六进制): {digest.hex()}”)print(f” SHA512摘要 (整数): {digest_int}”)print(f” SHA512摘要位数: {digest_int.bit_length()} 位”) # 步骤2: 计算私钥print(f”\n[步骤2] 计算私钥 (对曲线阶数取模)…”)priv_int = digest_int % curve_orderprint(f” 私钥 (整数): {priv_int}”)print(f” 私钥 (十六进制): {hex(priv_int)}”)print(f” 私钥位数: {priv_int.bit_length()} 位”) # 步骤3: 转换为字节格式print(f”\n[步骤3] 转换为字节格式…”)priv_bytes = priv_int.to_bytes(66, ‘big’)print(f” 私钥 (字节长度): {len(priv_bytes)} 字节”)print(f” 私钥 (字节hex): {priv_bytes.hex()}”) # 步骤4: 创建签名密钥对象print(f”\n[步骤4] 创建签名密钥对象…”)try: sk = SigningKey.from_string(priv_bytes, curve=NIST521p) vk_test = sk.verifying_key print(” ✓ 签名密钥对象创建成功”)except Exception as e: print(f” ✗ 签名密钥对象创建失败: {e}”) sk = None vk_test = None # 步骤5: 验证私钥print(f”\n[步骤5] 验证私钥是否正确…”)if sk and vk_test: if vk_test.to_string() == vk.to_string(): print(” ✓ 私钥验证成功! 私钥正确!”) # 步骤6: 输出flag flag_hex = hex(priv_int)[2:] # 去掉0x前缀 print(f”\n” + “=” * 80) print(f”私钥 (十六进制,去掉0x): {flag_hex}”) print(f”\n” + “=” * 80) print(f”Flag: flag{{{flag_hex}}}”) print(“=” * 80) # 额外验证: 测试签名 print(f”\n[额外验证] 使用恢复的私钥进行签名测试…”) test_msg = b”test message” test_sig = sk.sign(test_msg) try: vk.verify(test_sig, test_msg) print(” ✓ 签名验证成功,进一步确认私钥正确”) except Exception as e: print(f” ⚠ 签名验证失败: {e}”) else: print(” ✗ 私钥验证失败! 生成的公钥与提供的公钥不匹配”) print(” 尝试方法2: 从签名恢复私钥…”) method1_success = Falseelse: print(” ✗ 无法创建签名密钥对象”) method1_success = False |
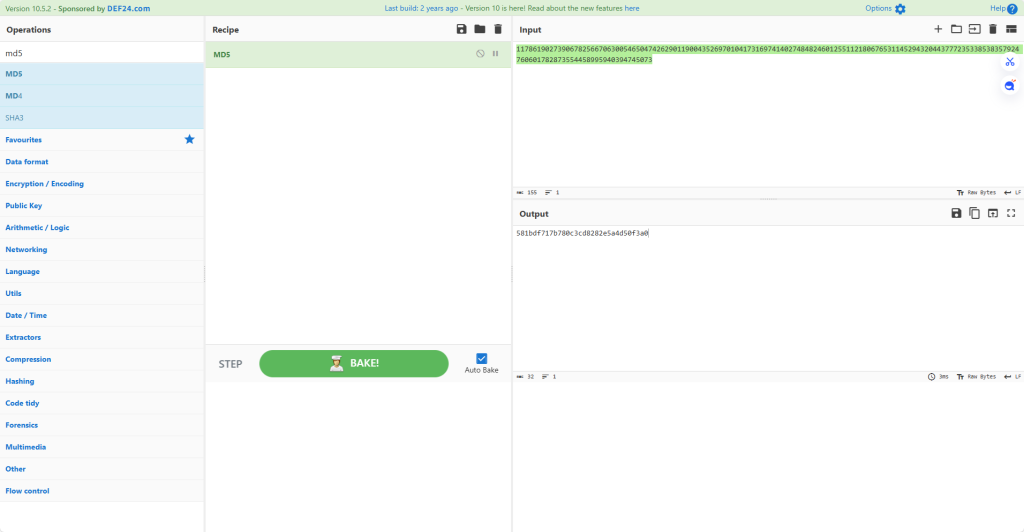
| 这里输出的是私钥 私钥 (整数): 5848022551640848821625446477716994866936098118919819708066070751486112077287088053042703802506281474548029927685263069362024455626067783968769070994600931326 但是会看题目发现要交的不是私钥是私钥的私钥的MD5值 |

flag值:
flag{581bdf717b780c3cd8282e5a4d50f3a0}
wasm-login
操作内容:
ndex.html 的登录逻辑:
调用 WASM 中的 authenticate 函数
const authResult = authenticate(username, password);
const authData = JSON.parse(authResult);
模拟发送到服务器
console.log(‘发送到服务器的数据:’, authData);
模拟服务器响应
simulateServerRequest(authData)
校验函数simulateServerRequest 函数
const check = CryptoJS.MD5(JSON.stringify(data)).toString(CryptoJS.enc.Hex);
if (check.startsWith(“ccaf33e3512e31f3”)){
resolve({ success: true });
}else{
resolve({ success: false });
}
服务器对 authenticate 返回的 JSON 数据进行 MD5 哈希
如果 MD5 值以 ccaf33e3512e31f3 开头,则登录成功
Flag 格式:flag{完整的32位MD5值}
WASM 逻辑还原:
authenticate 函数流程:
1.密码 Base64 编码
使用自定义 Base64 字母表对 password 进行编码
字母表:NhR4UJ+z5qFGiTCaAIDYwZ0dLl6PEXKgostxuMv8rHBp3n9emjQf1cWb2/VkS7yO
填充字符:=
这里写一个base64自定义表脚本即可
2.时间戳获取
timestamp = Date.now().toString()
时间戳作为 HMAC 的密钥
推测成功登录时间戳在 2025-12-22 00:29 附近
2025/12/21 是第三个周末的周日,凌晨 0:xx 已是 22 号(周一)
并且MD5hash:以 `ccaf33e3512e31f3` 开头
这里写一个爆破脚本使hash值符合以 `ccaf33e3512e31f3` 开头并且时间在 2025-12-22 00:29 附近即可
2.构建消息
message = {“username”:…, “password”:<b64>}
其中 <b64> 是经过自定义 Base64 编码的密码
4.计算签名
signature = hmacSHA256(secret=timestamp, message)
使用”怪异”的 HMAC 实现
签名结果同样使用自定义 Base64 编码
这里怪异HMAC在下方有解释
5.返回结果
{“username”:…, “password”:<b64>, “signature”:<b64>}
Base64编码换标编码即可(代码在代码区)
时间戳爆破
怪异 HMAC-SHA256 实现:
ipad = key ^ 0x76 (重复 0x76)
opad = key ^ 0x3C (重复 0x3C)
脚本
| Base编码CUSTOM_BASE64_ALPHABET = “NhR4UJ+z5qFGiTCaAIDYwZ0dLl6PEXKgostxuMv8rHBp3n9emjQf1cWb2/VkS7yO”PADDING = ‘=’ def custom_base64_encode(data: bytes) -> str: “””自定义 Base64 编码””” if len(data) == 0: return “” # 将字节转换为二进制字符串 binary = ”.join(format(b, ’08b’) for b in data) # 填充到 6 的倍数 padding_bits = (6 – len(binary) % 6) % 6 binary += ‘0’ * padding_bits # 每 6 位转换为一个字符 result = [] for i in range(0, len(binary), 6): index = int(binary[i:i+6], 2) result.append(CUSTOM_BASE64_ALPHABET[index]) # 添加填充 padding_chars = len(data) % 3 if padding_chars == 1: result.append(PADDING) result.append(PADDING) elif padding_chars == 2: result.append(PADDING) return ”.join(result) 时间戳爆破#!/usr/bin/env python3# -*- coding: utf-8 -*-“””仅用于爆破时间戳的脚本在 00:29:08 ±2 分钟窗口内枚举毫秒时间戳,寻找满足 MD5 前缀条件的时间戳””” import jsonimport hashlibfrom datetime import datetime, timezone, timedelta # 自定义 Base64 字母表CUSTOM_BASE64_ALPHABET = “NhR4UJ+z5qFGiTCaAIDYwZ0dLl6PEXKgostxuMv8rHBp3n9emjQf1cWb2/VkS7yO”PADDING = ‘=’ def custom_base64_encode(data: bytes) -> str: “””自定义 Base64 编码””” if len(data) == 0: return “” binary = ”.join(format(b, ’08b’) for b in data) padding_bits = (6 – len(binary) % 6) % 6 binary += ‘0’ * padding_bits result = [] for i in range(0, len(binary), 6): index = int(binary[i:i+6], 2) result.append(CUSTOM_BASE64_ALPHABET[index]) padding_chars = len(data) % 3 if padding_chars == 1: result.append(PADDING) result.append(PADDING) elif padding_chars == 2: result.append(PADDING) return ”.join(result) def custom_hmac_sha256(secret: str, message: str) -> bytes: “””怪异的 HMAC-SHA256 实现””” key_bytes = secret.encode(‘utf-8′) if len(key_bytes) > 64: key_bytes = hashlib.sha256(key_bytes).digest() if len(key_bytes) < 64: key_bytes = key_bytes + b’\x00’ * (64 – len(key_bytes)) ipad = bytes(b ^ 0x76 for b in key_bytes) opad = bytes(b ^ 0x3C for b in key_bytes) message_bytes = message.encode(‘utf-8’) inner = hashlib.sha256(ipad + message_bytes).digest() outer = hashlib.sha256(inner + opad).digest() return outer def authenticate(username: str, password: str, timestamp: int) -> str: “””复现 authenticate 函数逻辑””” password_b64 = custom_base64_encode(password.encode(‘utf-8’)) timestamp_str = str(timestamp) message = json.dumps({“username”: username, “password”: password_b64}, separators=(‘,’, ‘:’)) signature_bytes = custom_hmac_sha256(timestamp_str, message) signature_b64 = custom_base64_encode(signature_bytes) result = { “username”: username, “password”: password_b64, “signature”: signature_b64 } return json.dumps(result, separators=(‘,’, ‘:’)) def brute_force_timestamp(): “””爆破时间戳:在 00:29:08 ±2 分钟窗口内枚举毫秒时间戳””” username = “admin” password = “admin” target_prefix = “ccaf33e3512e31f3” # 时间戳范围:00:29:08 ±2 分钟 base_time = datetime(2025, 12, 22, 0, 29, 8, 0, tzinfo=timezone(timedelta(hours=8))) base_timestamp = int(base_time.timestamp() * 1000) window_ms = 2 * 60 * 1000 # ±2 分钟 = 120000 毫秒 start_timestamp = base_timestamp – window_ms end_timestamp = base_timestamp + window_ms # 枚举所有毫秒时间戳 for timestamp in range(start_timestamp, end_timestamp + 1): try: # 调用 authenticate auth_result = authenticate(username, password, timestamp) # 计算 MD5 check = hashlib.md5(auth_result.encode(‘utf-8’)).hexdigest() # 检查前缀 if check.startswith(target_prefix): return timestamp except Exception: continue return None if __name__ == “__main__”: result = brute_force_timestamp() if result: print(result) else: print(“未找到匹配的时间戳”) 脚本成功找到时间戳:1766334550699 |
| def custom_hmac_sha256(secret: str, message: str) -> bytes: “”” 怪异的 HMAC-SHA256 实现 – key 填充/哈希到 64 字节 – ipad = key ^ 0x76 – opad = key ^ 0x3C – inner = sha256(ipad || message) – outer = sha256(inner || opad) “”” # 将 secret 转换为字节 key_bytes = secret.encode(‘utf-8′) # key 填充/哈希到 64 字节 if len(key_bytes) > 64: # 如果 key 超过 64 字节,先哈希 key_bytes = hashlib.sha256(key_bytes).digest() # 填充到 64 字节 if len(key_bytes) < 64: key_bytes = key_bytes + b’\x00’ * (64 – len(key_bytes)) # ipad = key ^ 0x76 ipad = bytes(b ^ 0x76 for b in key_bytes) # opad = key ^ 0x3C opad = bytes(b ^ 0x3C for b in key_bytes) # inner = sha256(ipad || message) message_bytes = message.encode(‘utf-8’) inner = hashlib.sha256(ipad + message_bytes).digest() # outer = sha256(inner || opad) outer = hashlib.sha256(inner + opad).digest() return outer |
| 汇总#!/usr/bin/env python3# -*- coding: utf-8 -*-“””爆破时间戳脚本 – 展示如何找到正确的时间戳在 00:29:08 ±2 分钟窗口内枚举毫秒时间戳,计算 MD5(final_json),寻找前缀 ccaf33e3512e31f3″”” import jsonimport hashlibfrom datetime import datetime, timezone, timedelta # 自定义 Base64 字母表CUSTOM_BASE64_ALPHABET = “NhR4UJ+z5qFGiTCaAIDYwZ0dLl6PEXKgostxuMv8rHBp3n9emjQf1cWb2/VkS7yO”PADDING = ‘=’ def custom_base64_encode(data: bytes) -> str: “””自定义 Base64 编码””” if len(data) == 0: return “” binary = ”.join(format(b, ’08b’) for b in data) padding_bits = (6 – len(binary) % 6) % 6 binary += ‘0’ * padding_bits result = [] for i in range(0, len(binary), 6): index = int(binary[i:i+6], 2) result.append(CUSTOM_BASE64_ALPHABET[index]) padding_chars = len(data) % 3 if padding_chars == 1: result.append(PADDING) result.append(PADDING) elif padding_chars == 2: result.append(PADDING) return ”.join(result) def custom_hmac_sha256(secret: str, message: str) -> bytes: “”” 怪异的 HMAC-SHA256 实现 – key 填充/哈希到 64 字节 – ipad = key ^ 0x76 – opad = key ^ 0x3C – inner = sha256(ipad || message) – outer = sha256(inner || opad) “”” key_bytes = secret.encode(‘utf-8′) if len(key_bytes) > 64: key_bytes = hashlib.sha256(key_bytes).digest() if len(key_bytes) < 64: key_bytes = key_bytes + b’\x00’ * (64 – len(key_bytes)) ipad = bytes(b ^ 0x76 for b in key_bytes) opad = bytes(b ^ 0x3C for b in key_bytes) message_bytes = message.encode(‘utf-8’) inner = hashlib.sha256(ipad + message_bytes).digest() outer = hashlib.sha256(inner + opad).digest() return outer def authenticate(username: str, password: str, timestamp: int) -> str: “””复现 authenticate 函数逻辑””” password_b64 = custom_base64_encode(password.encode(‘utf-8’)) timestamp_str = str(timestamp) message = json.dumps({“username”: username, “password”: password_b64}, separators=(‘,’, ‘:’)) signature_bytes = custom_hmac_sha256(timestamp_str, message) signature_b64 = custom_base64_encode(signature_bytes) result = { “username”: username, “password”: password_b64, “signature”: signature_b64 } return json.dumps(result, separators=(‘,’, ‘:’)) def brute_force_timestamp(show_details=False, show_progress=True): “”” 爆破时间戳 在 00:29:08 ±2 分钟窗口内枚举毫秒时间戳 “”” print(“=” * 80) print(“时间戳爆破脚本”) print(“=” * 80) # 参数设置 username = “admin” password = “admin” target_prefix = “ccaf33e3512e31f3″ # 方法1: 使用已知的时间戳作为基准 # 已知: 时间戳 1766334550699 对应 2025-12-22 00:29:10.699 北京时间 # 北京时间 2025-12-22 00:29:08 = UTC 2025-12-21 16:29:08 # UTC 时间戳 = 1766334550699 – (10.699 – 8) * 1000 = 1766334550699 – 2699 = 1766334548000 # 更准确的方法:直接构造时间 # 2025-12-22 00:29:08 北京时间 base_time_beijing = datetime(2025, 12, 22, 0, 29, 8, 0, tzinfo=timezone(timedelta(hours=8))) base_timestamp = int(base_time_beijing.timestamp() * 1000) # ±2 分钟 = ±120 秒 = ±120000 毫秒 window_ms = 2 * 60 * 1000 # 2分钟 = 120000毫秒 start_timestamp = base_timestamp – window_ms end_timestamp = base_timestamp + window_ms print(f”\n爆破参数:”) print(f” 用户名: {username}”) print(f” 密码: {password}”) print(f” 目标 MD5 前缀: {target_prefix}”) print(f”\n时间戳范围:”) print(f” 基准时间: {base_time_beijing.strftime(‘%Y-%m-%d %H:%M:%S’)} (北京时间)”) print(f” 基准时间戳: {base_timestamp}”) print(f” 搜索窗口: ±2 分钟 (±{window_ms} 毫秒)”) print(f” 开始时间戳: {start_timestamp}”) print(f” 结束时间戳: {end_timestamp}”) start_time = datetime.fromtimestamp(start_timestamp / 1000, tz=timezone(timedelta(hours=8))) end_time = datetime.fromtimestamp(end_timestamp / 1000, tz=timezone(timedelta(hours=8))) print(f” 开始时间: {start_time.strftime(‘%Y-%m-%d %H:%M:%S.%f’)[:-3]} (北京时间)”) print(f” 结束时间: {end_time.strftime(‘%Y-%m-%d %H:%M:%S.%f’)[:-3]} (北京时间)”) total_timestamps = end_timestamp – start_timestamp + 1 print(f” 总时间戳数: {total_timestamps:,} 个”) print(f”\n开始爆破…”) print(“-” * 80) found = False tested_count = 0 last_progress_time = start_timestamp # 枚举所有毫秒时间戳 for timestamp in range(start_timestamp, end_timestamp + 1): tested_count += 1 try: # 调用 authenticate auth_result = authenticate(username, password, timestamp) # 计算 MD5 check = hashlib.md5(auth_result.encode(‘utf-8’)).hexdigest() # 显示详细信息(可选) if show_details and tested_count <= 5: current_time = datetime.fromtimestamp(timestamp / 1000, tz=timezone(timedelta(hours=8))) print(f”\n[测试 {tested_count}]”) print(f” 时间戳: {timestamp}”) print(f” 时间: {current_time.strftime(‘%Y-%m-%d %H:%M:%S.%f’)[:-3]} (北京时间)”) print(f” authenticate 返回: {auth_result}”) print(f” MD5: {check}”) print(f” 前缀匹配: {check.startswith(target_prefix)}”) # 检查前缀 if check.startswith(target_prefix): current_time = datetime.fromtimestamp(timestamp / 1000, tz=timezone(timedelta(hours=8))) print(“\n” + “=” * 80) print(“找到匹配!”) print(“=” * 80) print(f”\n时间戳: {timestamp}”) print(f”时间: {current_time.strftime(‘%Y-%m-%d %H:%M:%S.%f’)[:-3]} (北京时间)”) print(f”UTC 时间: {datetime.fromtimestamp(timestamp / 1000, tz=timezone.utc).strftime(‘%Y-%m-%d %H:%M:%S.%f’)[:-3]}”) print(f”\nauthenticate 返回的 JSON:”) print(f” {auth_result}”) # 解析 JSON 显示详细信息 auth_data = json.loads(auth_result) print(f”\nJSON 解析:”) print(f” username: {auth_data[‘username’]}”) print(f” password (Base64): {auth_data[‘password’]}”) print(f” signature (Base64): {auth_data[‘signature’]}”) print(f”\nMD5 哈希:”) print(f” 完整值: {check}”) print(f” 前缀: {check[:16]} (匹配目标: {target_prefix})”) print(f” 后缀: {check[16:]}”) print(f”\n爆破统计:”) print(f” 测试时间戳数: {tested_count:,}”) print(f” 搜索范围: {total_timestamps:,} 个时间戳”) print(f” 命中率: {1/total_timestamps*100:.6f}%”) print(f”\nFlag: flag{{{check}}}”) print(“=” * 80) found = True return timestamp, check except Exception as e: if show_details: print(f”错误 (时间戳 {timestamp}): {e}”) continue # 显示进度(每1000个时间戳或每10秒) if show_progress: if tested_count % 1000 == 0 or (timestamp – last_progress_time) >= 10000: current_time = datetime.fromtimestamp(timestamp / 1000, tz=timezone(timedelta(hours=8))) progress = (tested_count / total_timestamps) * 100 print(f”进度: {progress:.2f}% | 时间: {current_time.strftime(‘%H:%M:%S.%f’)[:-3]} | 已测试: {tested_count:,}/{total_timestamps:,}”, end=’\r’) last_progress_time = timestamp if not found: print(f”\n未找到匹配的时间戳”) print(f”共测试了 {tested_count:,} 个时间戳”) return None, None if __name__ == “__main__”: import sys # 解析命令行参数 show_details = “–details” in sys.argv or “-d” in sys.argv show_progress = “–no-progress” not in sys.argv print(“\n提示: 使用 –details 或 -d 参数可以显示前5个时间戳的详细信息”) print(“=” * 80 + “\n”) timestamp, check = brute_force_timestamp(show_details=show_details, show_progress=show_progress) if timestamp: print(f”\n成功找到时间戳: {timestamp}”) print(f”对应的 Flag: flag{{{check}}}”) else: print(“\n未找到匹配的时间戳”) |


评论(0)
暂无评论